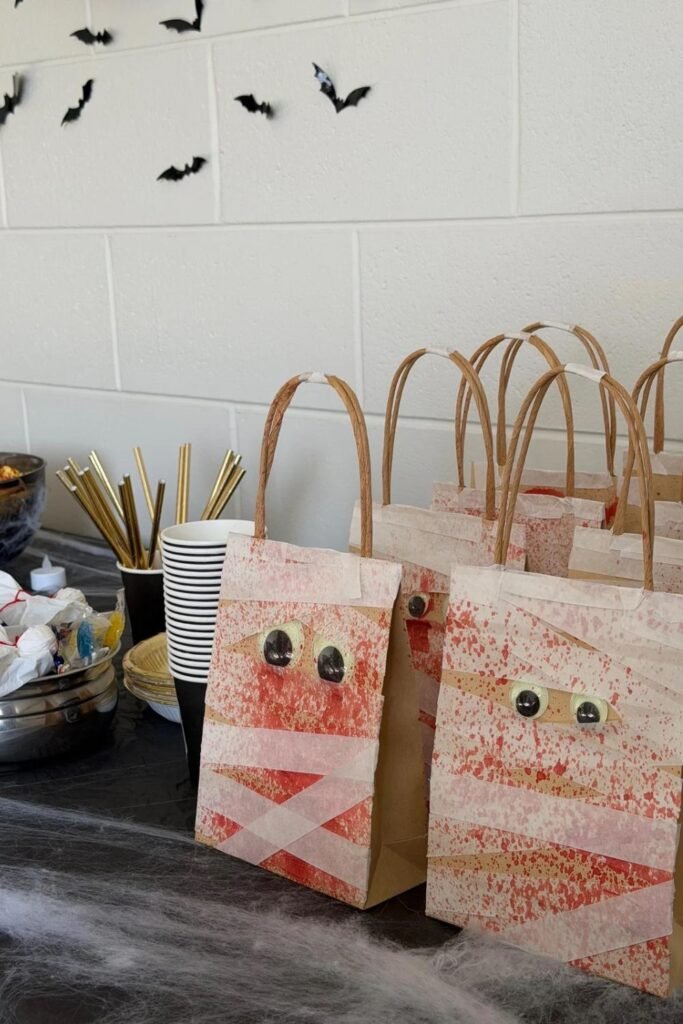
DIY Halloween Goodie Bags: Easy Mummy Tutorial
These DIY Halloween Goodie Bags are so cute! With just a few simple materials, such as kraft paper bags, masking tape, glow-in-the-dark googly eyes… or just regular ones, and fake blood spray or food coloring. You can create spooky little creations in minutes. The best part? They’re so easy that anyone can make them, regardless of crafting experience. I am using these for my Halloween Goodie Bags to give to my guests at the end of my Halloween Dinner Party. I think its such a neat touch having something hand crafted like this. If you want to make your own, this is exactly how I did it.

What You’ll Need
Materials:
- Brown kraft paper gift bags
- Masking tape
- Glow-in-the-dark googly eyes (2 per bag)
- Double-sided tape (if your googly eyes aren’t self-adhesive)
- Fake blood spray, or red food coloring if you cant find any
- Scissors
Time Required: 3-7 minutes per bag
Step 1: Attach the Glow-in-the-Dark Googly Eyes
Start by attaching two glow-in-the-dark googly eyes onto the front of your kraft paper bag. If your eyes aren’t self-adhesive, use small pieces of double-sided tape on the back of each eye to secure them firmly. Position them roughly in the center, fairly close together and at the same height. These will be your mummy’s face peeking through the bandages.
Step 2: Apply the Masking Tape Randomly
Take your masking tape and start placing it anywhere on the front of the bag, for all of mine I did it horizontally but on a slight angle. Don’t overthink the placement, its suppose to look messy.
Layer some tape over other pieces, leave gaps, angle them at different heights.
Step 3: Spray with Fake Blood
Once your masking tape is in place, grab your fake blood spray and apply it generously over the entire bag. Spray in quick bursts, covering the tape, the kraft paper, and even the googly eyes. If you dont want blood on the eyes, simply just wipe it off once yo uare finished spraying.
Tip: Do this step outside or in a well-ventilated area. Test on a spare piece of material first to get a feel for how the spray disperses.
Optional: I added extra tape over the blood splatters to add more depth to my mummy Halloween bag, but this is totally optional and a personal preference.
Step 4: Let It Dry
Allow the fake blood to dry completely before handling. Once dry, Trim the excess tape from the sides and your mummy bag is nearly finished.
Step 5: Fill Your Bags
Fill the bags with Halloween treats, candy, small toys, or whatever goodies you’d like to give out.


Pro Tips for Success
Go Random with the Tape: The less you plan, the better. Let your tape placement be completely haphazard for the most authentic mummy look.
Use Different Tape Widths: If you have painter’s tape or other widths available, varying the tape width adds more visual interest, but not only width, differnt tape shades and colours could look amazing too.
Angle Your Spray: Spray from above, from the sides, and even a bit from below to create uneven splatters and drips that look like real dried blood.
Layer It: For an even more dramatic effect, let the first coat of blood dry and then apply a second layer for deeper color and more texture.
Test the Glow: Charge up the glow-in-the-dark eyes under a bright light before giving out the bags for maximum spooky effect!


Customization Ideas
Color Variations: Use different colored sprays (black for a classic mummy look, or go wild with green or purple for variety).
Partial Wrapping: Wrap only part of the bag—maybe just the bottom or one side—for a slightly less wrapped mummy.
Mixed Media: Combine with other materials like torn paper, gauze, or additional tape types for extra texture.
Glitter Blood: Some fake blood sprays have glitter in them for an extra sparkly, spooky effect.
Troubleshooting
Tape Won’t Stick to the Bag: Make sure your bag surface is clean and dry. Press the tape firmly as you apply it.
Blood Spray Isn’t Showing Up Well: Make sure you’re spraying from close enough (follow the product’s instructions) and use enough coats for good color saturation.
Googly Eyes Won’t Stay On: If you’re using non-adhesive eyes, make sure to use strong double-sided tape and press firmly for several seconds to ensure good adhesion.
Enjoy your quick and creepy mummy creations!
And thats it! Its such a simple Halloween Craft but looks actually amazing, and is bound to get your guests talking! Every bag is slightly unique and that’s what I love about. If you love Halloween and you love crafting, check out some other Halloween Crafts. Happy Halloween
Easy DIY Halloween Tapered Candles | Fun & Spooky Craft Tutorial